
helloworld
rest PostMapping 2 본문
전 글에서 post기능을 사용했다. 그 결과 200이라는 상태코드를 받았고, 정상처리 되었다.
이번엔 상태코드를 제어할 것이다.
ServletUriComponentsBuilder 클래스를 사용하여 서버에서 전달하는 값을 ResponseEntity에 담아서 전달한다.
사용자추가 작업을 완료후에 어떤 uri를 들고 확인을 할 수 있는지 (상세정보 확인)까지 전달한다.
1.
ServletUriComponentsBuilder.fromCurrentRequest()
.path("/{id}")
.buildAndExpand(savedUser.getId())
.toUri();
.path("/{id}")
.buildAndExpand(savedUser.getId())
.toUri();
path에 가변변수를 넣은 후
buildAndExpand로 user의 getter를 이용하여 값을 지정한다.
uri값으로 변환한다..
2.
URI location = ServletUriComponentsBuilder.fromCurrentRequest()
.path("/{id}")
.buildAndExpand(savedUser.getId())
.toUri();
.path("/{id}")
.buildAndExpand(savedUser.getId())
.toUri();
리턴값 URI로 지정한다.
3.
@PostMapping("/users")
public ResponseEntity<User> createUser(@RequestBody User user) {
User savedUser = service.save(user);
URI location = ServletUriComponentsBuilder.fromCurrentRequest()
.path("/{id}")
.buildAndExpand(savedUser.getId())
.toUri();
return ResponseEntity.created(location).build();
}
public ResponseEntity<User> createUser(@RequestBody User user) {
User savedUser = service.save(user);
URI location = ServletUriComponentsBuilder.fromCurrentRequest()
.path("/{id}")
.buildAndExpand(savedUser.getId())
.toUri();
return ResponseEntity.created(location).build();
}
ResponseEntity로 리턴한다.
다시 postman에서 post 요청을 보내면
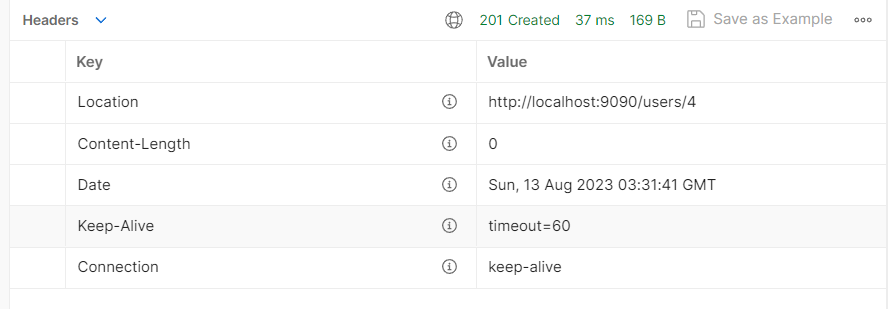
201상태 코드를 받는다.
서버로부터 적절한 상태코드를 받는게 좋은 restful api 설계하는 방법중에 하나라고 한다.
엔티티에 넣었던 것이 header영역에 새로 추가한 유저의 uri까지 전부 나온다.
'restful' 카테고리의 다른 글
| DELETE 기능 (0) | 2023.08.13 |
|---|---|
| Exception 처리 심화과정 .. (0) | 2023.08.13 |
| Exception 처리 (0) | 2023.08.13 |
| restful PostMapping (0) | 2023.08.13 |
| RESTful 프로젝트? (0) | 2023.08.13 |
'restful' Related Articles
more


